

Eco app
How can I reset my password in the Eco app?
Variant 1:
Ask your employer / database administrator to give you a new password. You can then log in again with the new password.
Variant 2:
- Click on the “Reset password” button on the Fairfleet Eco app login screen.
- Then enter your e-mail address in the “User (e-mail)” field.
- Enter the database name in the “Database” field.
Leave this field blank if you are only registered in one database. The system recognizes this automatically and assigns you to the correct database. - Enter the letters and numbers from the image in the field.
- Confirm the entry with the “OK” button.
If your entries were correct, confirm the information with “OK” and switch to your e-mail inbox. Here you will find an e-mail with a link to reset your password.
Once you have set a new password, you can now open the Fairfleet Eco app again and log in as usual.
How do I register?
To register, use the e-mail address provided by your employer. This is usually your company e-mail address and the corresponding password.
How do I select a vehicle manually?
If the vehicle you want to register is not displayed, use the search field. You can search for license plates or designations so that the vehicle selection is adjusted accordingly. After selecting the vehicle, confirm the registration.
How do I select a vehicle using NFC?
After logging into the app, you will be taken to the vehicle selection screen. If your cell phone supports NFC and the function is switched on, hold the corresponding spot on the NFC login tag in your vehicle. You will then be logged in automatically and will be taken to the driving screen.
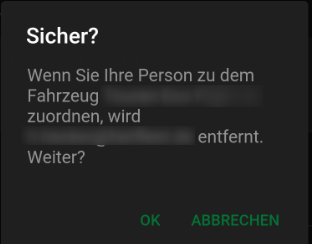
Another driver is still registered. What happens now?
If a previous driver has not logged off properly after a journey, first switch off the ignition for approx. 30 seconds to signal the end of a journey section to the system. Also make sure that you are in the correct vehicle and that you have selected it. Then confirm the takeover of the vehicle. For your security, all processes are documented in a tamper-proof manner.
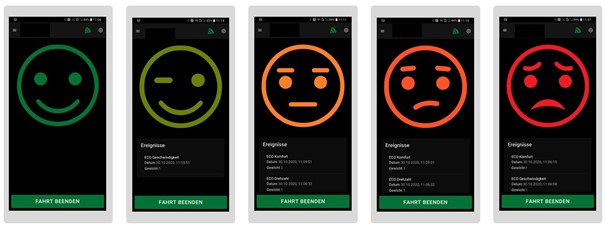
When does the emojicon change its appearance and color?
The vehicle telematics system transmits values such as acceleration and braking processes, engine speed, lateral acceleration and other values to a background system. If previously set values are exceeded by your employer, these events will be displayed in the Eco app. When preset values are exceeded, the emojis change their appearance and color and are intended to reflect their driving behavior.
Which events are evaluated here?
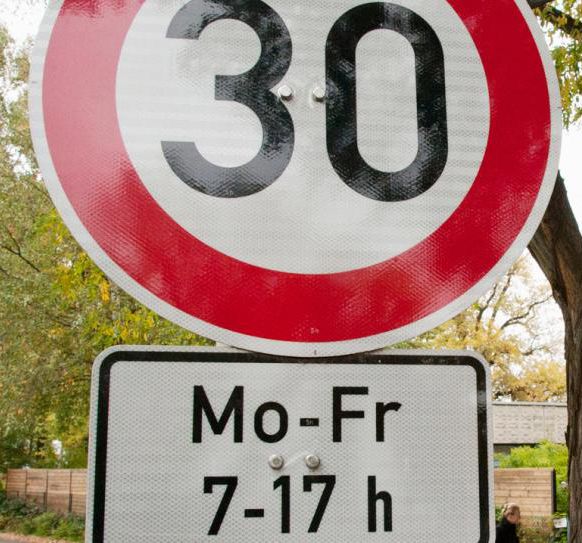
Basically, your employer, or the owner of the database, determines what is evaluated here. However, some points have proven to be essential for an economical and stress-free driving style. These include the G-forces that occur during acceleration and braking, as well as the G-forces when cornering. Furthermore, the engine speed is usually also evaluated, as high engine speeds above the maximum torque only lead to high fuel consumption, as does running the engine unnecessarily when stationary. This not only burdens your company, but also the environment to a considerable extent. On average, a car burns approx. 0.9 l/hour and a truck or bus approx. 3.5 l/hour. The assessment of speeding is intended to encourage legally compliant driving behavior, thereby reducing accidents and increasing road safety.
What does the addition "weight" under an event mean?
Here your employer has the option of giving certain events a higher or lower weighting. This then affects the threshold values at which the Eco app changes the emojicons. For example, the Eco app only counts 1/2 a point for a weight of 0.5 and 2 points for a weight of 2.0.
Which period is evaluated?
The period to be evaluated is set individually by your employer. A period of 10 minutes has proven to be a good period to evaluate. This is a rolling period, i.e. the last 600 seconds are always evaluated. All events within this past period are included in the current valuation. If events are older than the set evaluation period, they are no longer evaluated and the emoji changes its face and color back to green or smiling.
Why are some events displayed with a delay?
If you are in an area with poor mobile phone coverage, the telematics device may send the data with a time delay and therefore also be displayed with a time delay in the Eco app.
Sometimes a speed event is displayed even though I am not driving too fast. Why is that?
The data for the maximum speed comes from third-party providers and can sometimes differ. There are also temporary speed limits, e.g. in front of schools and kindergartens, where only the lower speed limit is saved. Your employer, or the person responsible for the telematics system, has the option of correcting this. Tell him the place, date and time for a correction.
What is displayed on the trip summary page?
The “Trip summary” page shows you a summary of the start and end of the trip, the distance traveled and, for example, the average speed. A list of events (exceeding the limit values) is also displayed for checking purposes.
What does "events per 100 km" mean?
In order to compare the driving style of different drivers, we put the events in relation to the distance traveled and convert it to 100 km. This allows you to compare your results with those of other drivers and assess your own driving behavior.
What is displayed under Dashboard?
The Dashboard menu item takes you to the dashboard in the Geotab portal. Here your employer can provide you with individual reports and information.
What data does Fairfleet store when I use the Eco app and who can see this data?
Fairfleet does not store or process any data from the Eco app. All data collected is stored and managed by the owner of the Geotab database. Talk to your employer or the owner of the Geotab database about the data collected. Your employer may already provide the relevant information.
Is there a short video explaining this?
Web portal
Help for the web portal
A detailed help function is integrated into the web portal of your Geotab database.
You can access these under the menu item:
First steps & help -> Product overview
Hardware
Device replacement in MyGeotab web portal
Make sure that the vehicle is stationary and the ignition is switched off.
Remove the old Geotab device by unplugging it.
Select the relevant vehicle in the MyGeotab portal under the Vehicles menu item.
- Click on the “More details” button.
- Then click on the “Replace with new device” button.
- Now enter the device number of the new device and confirm the process with “OK”.
Now plug the new Geotab device into the vehicle.
After successful installation, please take a test drive.
If all data arrives correctly, the reinstallation or replacement process has been successfully completed.
Download instructions as PDF file: Exchange GEOTAB DEVICE
SDK/API
Description SDK/API
The complete description of the API can be found at
The documentation is in English. We are working on a translation.
Installation
Replace Geotab device
Make sure that the vehicle is stationary and the ignition is switched off.
Remove the old Geotab device by unplugging it.
Select the relevant vehicle in the MyGeotab portal under the Vehicles menu item.
- Click on the “More details” button.
- Then click on the “Replace with new device” button.
- Now enter the device number of the new device and confirm the process with “OK”.
Now plug the new Geotab device into the vehicle.
After successful installation, please take a test drive.
If all data arrives correctly, the reinstallation or replacement process has been successfully completed.
Download instructions as PDF file: Exchange GEOTAB DEVICE
Web form for installation problems
Before you fill out and send in this form, please check the installation according to the following instructions. installation instructions and follow the respective points exactly. Always complete the installation by entering the data in InstallmyGPS.
Please check the applicable points in the form and describe the error in the comment field. This will help us to find the error quickly and effectively and support you with the installation.
We will contact you within 24 hours on working days or on the first working day after weekends or public holidays (national holidays and NRW).
Device does not communicate
Symptoms
- GO device is installed in a vehicle, but the device status indicates that the device is not communicating
- GO device is added to the database, but does not send any data to the database
- GO device status never shows activated
APPLIES TO
- New, never activated GO device
- Device activation
Cause
- The device has not met the requirements for activation.
- The new GO device has not been added to the MyGeotab database.
Resolution
Activation:
- Drive the vehicle in which the GO device is installed on a 10-15 minute trip in an area with good cellular coverage to fulfill the activation requirements.
Device that has not been added in MyGeotab:
- Make sure you add the new device to the MyGeotab database: To add a new vehicle in MyGeotab
ADDITIONAL NOTES
Further information on the activation requirements for GO devices can be found in the following article:
What does a GO device need to be activated?
If the device is not activated after driving with the GO device and vehicle, please continue with the troubleshooting steps described here : Troubleshooting guide
Data protocols GO devices
The following protocols are supported:
- Legacy OBD (SAE J1850 PWM/VPW, ISO 9141-2 and ISO 14230 (KWP2000))
- Single-wire CAN (GM 33.3 kBit/s, Fiat/Dodge 50 kBit/s)
- ISO 15765 CAN (including WWH-OBD, GMLAN, VW TP2.0) at 125/250/500 kBit/s
- Medium-speed CAN of 125/250/500 kBit/s
- J1939-13 Type 2
- TTL CAN
- 2- or 3-wire installation is supported (for older vehicles/inventory tracking)
Supply voltage GO devices
The GO device can be connected to both 12 V and 24 V vehicle electrical systems. A manual changeover is not necessary.
Voltage and current
Voltage: 12 V and 24 V systems supported
Current (at 12 V): Operating mode: 60-300 mA
Operating mode + IOX: up to 2 A
Sleep mode: 1.5 mA
Resettable overcurrent protection for IOX
Connection to the FMS interface
The connection to the FMS data line of a vehicle is made using the GT HRN-CW08K4 cable sets in conjunction with the GT HRN-CM24Y1. GT HRN-CM24Y1.
HRN-CM24Y1
Description
GO device wiring harness for customized installations. Molex connector for two OBD and one J1939 connection point.
Further information
Replaces: HRN-INTCPDUAL
Length: 20 cm
Purpose
For custom installations that require multiple connection points to access motor data and motor logs. The wiring harness consists of an ALDL connector at one end for the GO device, a white 6-pin Molex connector for an OBD connection, a black 12-pin Molex connector for a second OBD connection and a second 6-pin Molex connector for a J1939 connection (GO7 & GO8 only).
Maximum length of connected cables: 2 meters / 6.5 feet
HRN-CW08K4
Description
8-wire pigtail adapter for vehicles with connectors that are not supported by any other wiring harness. Requires HRN-CM24Y1.
Further information
Requires: HRN-CM24Y1
Length: 80 cm
Maximum length of connected cables: 2 meters / 6.5 feet
PIN definition
Red – power source, black – vehicle floor, blue – J1939+/CAN High, white – J1939-/CAN Low, brown – J1850-/J1708+, green – J1850+/J1708-, orange – ISO K-line, gray – ISO L-line
Standard OBD-II installation Geotab GO9 device
The Geotab GO device is designed as standard for plug and play installation on the OBD-II interface of your vehicle.
Plug the device into the existing OBD-II diagnostic socket. Use the standard Y-cable (GT HRN-GS16K2) so that the socket remains free for workshop diagnostics.
Position the device so that good GPS reception is guaranteed.
If possible, secure the device in a suitable location using the standard installation kit (GT SPR-INSTALLBAG).
If you have any questions about the position of the OBD II socket, ask your workshop or contact our support team.
Tariff change
How do I change a tariff?
You can make tariff changes conveniently by e-mail to mail@fairfleet.de or using the online form.
The respective valid prices in the tariff sheet apply.